Holding crypto on a centralized exchange means you do not actually control it. The exchange holds the private keys. If the platform is hacked, goes bankrupt, or faces regulatory action, your access can disappear — even if the underlying blockchain is fine.
Self-custody flips that: you hold the keys yourself, usually on a device you own. This guide gives you a practical, safety-first walkthrough for moving assets off an exchange into your own hardware wallet. It is aimed at newcomers who already have crypto on an exchange and want to take the next step toward real ownership.
Not financial advice. Cryptocurrency is volatile and moving it yourself is irreversible if you err. Only risk what you can afford to lose while practicing. Start with tiny test amounts. Always verify the latest instructions from your wallet manufacturer.
Why exchanges are risky for long-term holding
Exchanges excel at liquidity and on-ramps, but they are custodial services. You are a customer, not an owner, of the coins shown in your account.
Real-world examples are numerous: hot-wallet breaches, platform insolvencies where withdrawals were halted, and even government-mandated freezes. In Latin America, users have seen local platforms impose sudden limits during currency crises or face liquidity problems of their own.
The phrase “not your keys, not your coins” exists because it is literally true on the blockchain. Until the coins are in an address whose private key only you possess, someone else can prevent you from spending them.
Keeping trading capital on the exchange can make sense for active traders. Everything else benefits from being moved to self-custody.
Picking the right tool for self-custody
For meaningful amounts, most people choose a hardware wallet. These are small physical devices that keep the private keys in a secure chip that never goes online. You plug them in (or tap) only when you want to sign a transaction, and you confirm the details on the device’s own screen.
Current reputable hardware options include devices from Ledger, Trezor, and card-style solutions like Tangem that have gained popularity in LatAm communities for their simplicity. Software-only wallets on a phone or laptop are acceptable for small balances or spending money, but they are “hot” — connected to the internet — and therefore more exposed.
Critical rule: Buy the device only from the official manufacturer’s website or authorized reseller listed on their site. Third-party marketplaces are flooded with tampered units that have been pre-loaded with known seed phrases. The few dollars you “save” can cost you everything.
The safe transfer process, step by step
The goal is simple: move the coins to an address you control, without ever exposing the private key, and without ever trusting a screen that malware could have altered.
Here is the sequence that minimizes the biggest risks.
1. Acquire and initialize your hardware wallet
Order directly from the maker. When the package arrives, open and initialize it in a private setting.
The device will walk you through creating a new wallet. It generates a recovery seed — a list of 12 or 24 ordinary words. This seed is the master backup for every key the device will ever create.
Write those words on durable paper or, better, on metal backup plates made for the purpose. Use a permanent pen. Make two or three copies. Store the copies in physically separate, reasonably secure locations. Never store the seed as a photo, in a note app, in cloud storage, or in a password manager.
Some newer devices offer multi-share (Shamir) backups across several cards or plates. If you use one, follow the exact distribution rules the manufacturer gives you.
2. Install official software and verify the device
Download the companion app (Ledger Live, Trezor Suite, Tangem app, etc.) only from the official site or app store. Some vendors provide checksums or signatures — use them.
Connect the device for the first time. The app will guide you through firmware checks and basic setup. If anything feels off — unexpected prompts, wrong firmware hash — stop and contact support through official channels only.
3. Generate and verify a receive address on the trusted screen
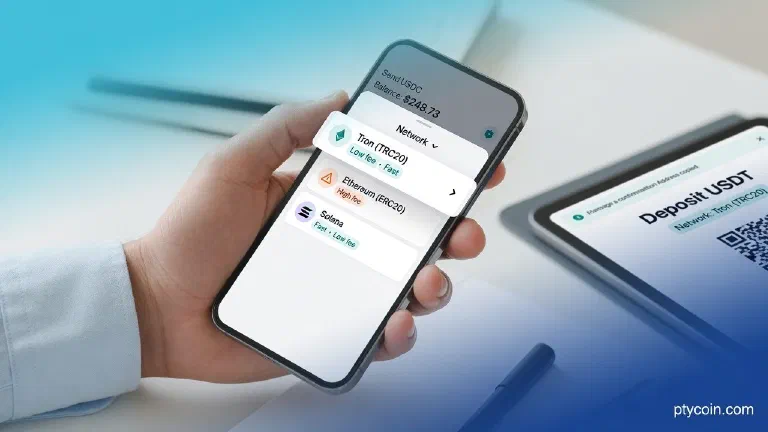
In the app, choose the coin you want to receive (Bitcoin, USDT on a supported network, etc.) and select “Receive” or “Deposit”.
An address will appear. Look at your hardware device’s screen. The address shown there is the one generated from the keys inside the secure element. If the address on your phone or computer matches the one on the device character-for-character, you can trust it.
This verification defeats clipboard hijackers and compromised apps that silently replace addresses with attacker-controlled ones.
4. Send a small test amount from the exchange
Log in to your exchange account. Navigate to the withdrawal screen for the correct asset and network (double-check the network — sending BTC to an Ethereum address is almost always permanent loss).
Paste the verified address. Manually compare the first few and last few characters to the ones you saw on the device screen.
Enter a deliberately small test amount — the equivalent of $10–30 is usually enough to see a confirmation without risking much. Pay the network fee the exchange quotes.
Complete any 2FA or email confirmations the exchange requires.
5. Confirm the test arrived in your wallet
Use a public block explorer (search for the transaction ID the exchange gave you) to watch for confirmations.
Once the transaction has the number of confirmations you are comfortable with, open your wallet app and verify that the balance reflects the test deposit and that the transaction appears under the correct account.
If it does not show up after a reasonable time, do not panic-send more. Troubleshoot the network, confirmations, or address first.
6. Move the rest of your holdings
Repeat the exact same address verification and manual character check for the remaining balance.
Consider leaving a small operational balance on the exchange if you day-trade or need frequent access, or move that remainder to a secondary self-custody setup (for example a mobile wallet with its own seed) that you use only for spending.
7. (Advanced) Test your backup
For larger stacks, it is wise to prove that your written seed actually restores the wallet. The safe way is to do this with a brand-new or wiped test device using a tiny amount you moved specifically for the test. Restore, confirm the funds appear, then move them back out and wipe the test device. This step is optional for tiny holdings but gives peace of mind for serious amounts.
A visual of the safe flow
Figure: The minimal safe flow. Verify the destination address on the hardware wallet’s own screen before any value moves. Send a test first; only proceed to the full amount once the test lands correctly.
Common fatal mistakes
Using the wrong network (ERC-20 USDT to a Bitcoin address, or vice versa).
Copying an address from a phishing site or poisoned recent transaction history.
Storing the seed phrase in a digital photo or document that gets uploaded or stolen.
Buying a “pre-configured” or second-hand device.
Rushing the character-by-character verification when tired or distracted.
Make verification a calm, deliberate ritual. If something feels rushed or confusing, stop.
Why this matters in Latin America
Crypto adoption across the region is driven by real economic needs: preserving value when local currency loses purchasing power quickly, receiving money from family abroad without high bank fees or delays, and accessing dollars or stablecoins when capital controls are in place.
In that context, leaving the bulk of your holdings on any single platform — foreign or local — reintroduces counterparty risk that many people turned to crypto specifically to escape.
Self-custody wallets give you bearer asset properties: if you have the seed (or the device + PIN), you can access the funds from anywhere with an internet connection and a compatible app. No account approval, no “please wait while we review,” no platform changing its terms overnight.
At the same time, the responsibility is real. In places where physical theft or family pressure can be concerns, think about where and how you store the physical backups. Some users split seed shares across borders or use durable metal plates hidden in everyday objects. The exact threat model varies by country and personal situation — the constant is: the fewer people or institutions who can access your coins without your active consent, the safer your long-term savings tend to be.
Hardware wallets that work with simple NFC taps or minimal connectivity are especially practical in areas where internet access or electricity can be spotty.
The bottom line
Self-custody is not harder than learning to use a new banking app; it just has higher stakes and different muscle memory. The routine — buy official hardware, write the seed by hand, verify every address on the device, test small — quickly becomes second nature.
Do it once with a small amount. Get the feel of the flow. Then move what you actually want to hold long-term.
Your keys, your coins, your responsibility.
Read the official documentation for whatever device you choose, keep firmware updated, and never share your seed phrase with anyone — not support staff, not “recovery services,” not friends. If you lose it, the coins are gone; if someone else gets it, the coins are gone.
Start small, verify everything, and give yourself the real ownership that drew most of us to this space in the first place.