Holding your own keys is empowering — until the moment you need to move value out. A mistyped address, the wrong network selection, or a skipped verification step can send funds to an address no one controls, with no customer support and no way back. Sending from self-custody is irreversible by design.
This guide gives you a calm, repeatable checklist that catches the most common sending errors before they cost you. It assumes you already have crypto in a self-custody wallet (software or hardware). If you are still moving funds off an exchange for the first time, start with the earlier self-custody 101 guide.
Not financial advice. Moving cryptocurrency yourself carries permanent loss risk if you make a mistake. Only practice with amounts small enough that an error would not hurt you. Always double-check the official documentation for your specific wallet and the recipient’s instructions. Fees, networks, and address formats can change.
Why sending is different from receiving
When you receive, the sender bears most of the error risk. When you send, the responsibility — and the permanent consequences — sit entirely with you.
Every transaction on a public blockchain is final once included in a block and sufficiently confirmed. There are no chargebacks, no “forgot password” resets, and no bank that can reverse it for you. The only protection is the ritual you follow before you press “send.”
Three facts make sending especially treacherous for newcomers:
- Addresses look similar but are not interchangeable. A Bitcoin address will not work for Ethereum or USDT on Tron. Paste the wrong one and the coins are almost always gone.
- Clipboard and QR attacks exist. Malware and some phishing pages replace the address you copied or the QR you scanned with an attacker address that looks almost identical.
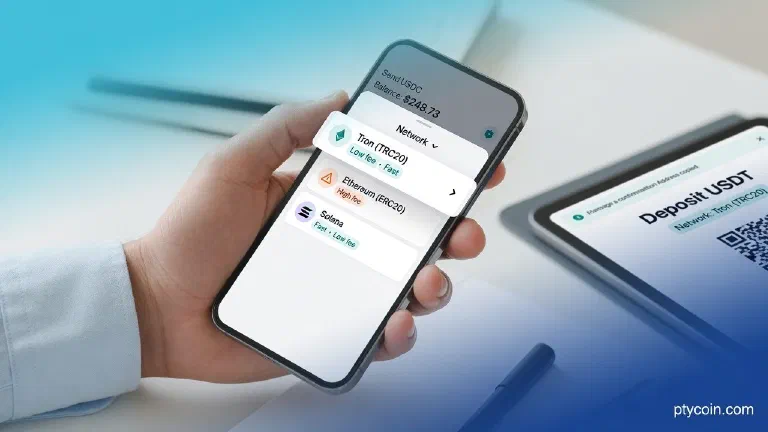
- Networks matter more than the asset name. “USDT” can mean half a dozen different token contracts on different chains. Choosing ERC-20 when the recipient expected TRC-20 (common and cheap in Latin America) usually means loss.
The good news: a short, disciplined checklist defeats nearly all of these problems.
The sending checklist
Do these steps in order, every time. Speed is the enemy; calm repetition is the defense.
1. Confirm the asset, network, and token standard with the recipient
Ask explicitly: “Which chain and token standard?” Do not assume “USDT” or “BTC” is enough. Get the answer in writing (chat, email) and keep it.
For stablecoins in the region, the most common low-fee choice is often USDT on Tron (TRC-20). Ethereum (ERC-20) is more expensive but widely supported. Bitcoin mainnet is for BTC only. Write down what they said.
2. Obtain the destination address securely
- Prefer an address the recipient just generated in front of you or over a verified channel.
- For remote recipients (family remittances are common in LatAm), ask them to send the address and then confirm the first 4–6 and last 4–6 characters over a second channel (voice call, different app).
- Never trust an address posted publicly or sent in a link you did not request.
3. Open the correct account in your wallet and select the matching network
In your wallet (Ledger Live, Trezor Suite, BlueWallet, Sparrow, Trust Wallet, MetaMask, etc.):
- Choose the exact asset.
- Explicitly select the network/chain that matches step 1.
- Generate or view a “send” form. Do not reuse old addresses blindly if the wallet offers fresh ones.
4. Paste and verify the address character-by-character
Paste the address.
Then:
- Read it aloud or compare side-by-side with the source.
- Check the first 6 and last 6 characters at minimum.
- If you are using a hardware wallet, the critical extra step: the address shown on the computer or phone must match the address shown on the device screen. Confirm on the device itself. This defeats clipboard malware and compromised companion apps.
If anything is off by a single character, stop. Ask the recipient to generate a fresh address and start over.
5. Enter the amount and review the fee
Enter the amount you intend to send.
Look at the network fee the wallet estimates. In high-fee periods on Ethereum or during busy Bitcoin blocks, a “normal” send can cost more than a small remittance is worth. You can usually choose lower priority (longer wait) or, for stablecoins, pick a lower-fee network if the recipient accepts it.
For hardware wallets, the fee will also appear on the device screen during the confirmation step.
6. Perform a test send for any material amount
If the amount is more than a few dollars of value to you, send a tiny test first (e.g. $5–20 equivalent or 0.0001 BTC).
- Complete the full send flow with the tiny amount.
- Share the transaction ID (txid) with the recipient so they can watch it land.
- Wait until they confirm the test arrived and shows the expected number of confirmations.
- Only then repeat the exact same flow for the real amount.
Many people skip this “because it’s small.” That is exactly when losses happen on the big one. The test costs almost nothing compared with the alternative.
7. Confirm on the device (hardware) or review the summary (software)
For hardware:
- The device will show the destination address, amount, and fee.
- Verify every field on the small trusted screen.
- Approve only if everything matches what you expect.
For software-only wallets used for small balances, read the summary screen twice. Still compare the address.
8. Broadcast and watch the transaction
Press send / broadcast.
Copy the txid the wallet provides.
Use a public block explorer (mempool.space for Bitcoin, tronscan.org for Tron, etherscan.io for Ethereum, etc.) to watch the transaction.
Tell the recipient the txid. Do not consider the send “done” until they report the funds visible with the number of confirmations appropriate for the asset:
- Bitcoin: often 1–6 depending on amount.
- Tron USDT: 1–3 is usually enough for small transfers.
- Ethereum and L2s: follow the recipient’s comfort level.
If the transaction is stuck (low fee, network congestion), some wallets let you replace-by-fee (RBF) or speed it up. Do not send again from another wallet.
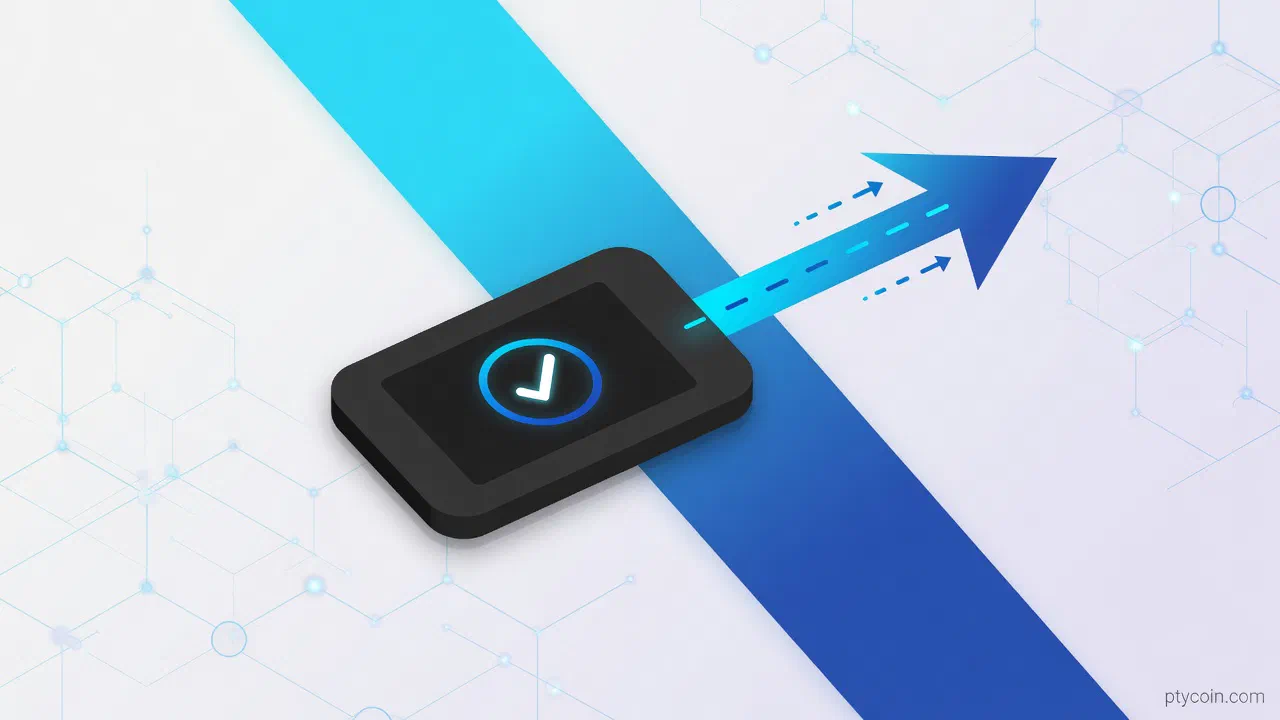
A visual sending flow
Figure: The minimal safe sending flow. Verify on a trusted display, test small, and only release the real amount after the recipient confirms the test landed.
Common sending mistakes (and how the checklist stops them)
- Wrong network for the token. The checklist forces explicit confirmation of chain + standard before you even open the send form.
- Address poisoning / recent tx history attack. Always fetch a fresh address from the recipient instead of copying the last one they sent you.
- Trusting the phone or laptop screen alone. Hardware users confirm the address on the device. Software users still read it twice.
- Sending the full amount first. The test step catches typos and network problems while almost no value is at risk.
- Assuming low fee is always better. Sometimes a slightly higher fee is worth it for time-sensitive remittances; the checklist makes you look at the number before broadcasting.
If the flow ever feels rushed — you are tired, the recipient is pressuring you, the UI looks different today — stop. The blockchain has no undo button.
LatAm practical notes
Remittances and P2P trades are everyday uses of self-custody across the region. Addresses are often shared over WhatsApp or voice notes. That environment makes the double-confirmation step in step 2 essential.
Mobile data can be expensive or unreliable in some areas. Choose networks with low fees for small transfers so the cost does not erase the benefit of self-custody. Tron and certain Bitcoin Lightning options (where supported by both sender and recipient) are popular precisely for this reason.
Fees quoted in dollars can look small until the local-currency equivalent matters for the recipient’s rent or groceries. Review the fee in both units.
Hardware devices that work with minimal or no constant connection (NFC cards, air-gapped signers) remain practical where electricity or internet is intermittent.
The bottom line
Self-custody gives you control no intermediary can take away. That control comes with the obligation to verify every detail of every move yourself.
The checklist above is short enough to memorize and powerful enough to protect the large majority of sends:
- Confirm the exact network.
- Verify the address twice, ideally on a hardware screen.
- Test small.
- Wait for the other side to confirm.
Do it calmly. Start with tiny practice amounts until the muscle memory feels natural. Then treat every larger send with the same respect.
Your keys. Your coins. Your verification ritual.
Read the sending instructions inside the wallet you actually use, keep your software and firmware current, and never share seed material with anyone. If a “support” person ever asks for your phrase or to “verify” by sending a test, it is a scam.
Send small, verify everything, and keep the ownership you earned by moving to self-custody in the first place.